 It's been 7 years since the last time I built "The Ultimate Developer PC 2.0," and over 11 since the original Ultimate Developer PC that Jeff Atwood built
 with for me. That last PC was $3000 and well, frankly, that's a heck of a lot of money. Now, I see a lot of you dropping $2k and $3k on MacBook Pros and Surfaces without apparently sweating it too much but I expect that much money to last a LONG TIME.
Do note that while my job does give me a laptop for work purposes every 3 years, my desktop is my own, paid for with my own money and not subsidized by my employer in any way. This PC is mine.
I wrote about money and The Programmer's Priorities in my post on Brain, Bytes, Back, and Buns. As Developer we spend a lot of time looking at monitors, sitting in chairs, using computers, and sleeping. It stands to reason we should should invest in good chairs, good monitors and PCs, and good beds. That also means good mice and keyboards, of course.
Was that US$3000 investment worth it? Absolutely. I worked on my PC2.0 nearly every day for 7 years. That's ~2500 days at about $1.25 a day if you consider upgradability.
Continuous PC Improvement via reasonably priced upgrades
How could I use the same PC for 7 years? Because it's modular.
- Hard Drive - I upgraded 3 years back to a 512 gig Samsung 850 SSD and it's still a fantastic drive at only about $270 today. This kept my machine going and going FAST.
- Video Card - I found a used NVidia 1070 on Craigslist for $250, but they are $380 new. A fantastic card that can do VR quite nicely, but for me, it ran three large monitors for years.
- Monitors - I ran a 30" Dell as my main monitor that I bought used nearly 10 years ago. It does require a DisplayPort to Dual-Link DVI active adapter but it's still an amazing 2560x1600 monitor even today.
- Memory - I started at 16 gigs and upgraded to 24 gigs when memory got cheaper.
All this adds up to me running the same first generation i7 processor up until 2018. And frankly, I probably could have gone another 3-5 years happily.
So why upgrade? I was gaming more and more as well as using my HTC Vive Pro and while the 1070 was great (although always room for improvement) I was pushing the original Processor pretty hard. On the development side, I have been running somewhat large distributed systems with Docker for Windows and Kubernetes, again, pushing memory and CPU pretty hard.
Ultimately however, price/performance for build-your-own PCs got to a reasonable place plus the ubiquity of 4k displays at reasonable costs made me think I could build a machine that would last me a minimum of 5 years, if not another 7.
Specifications
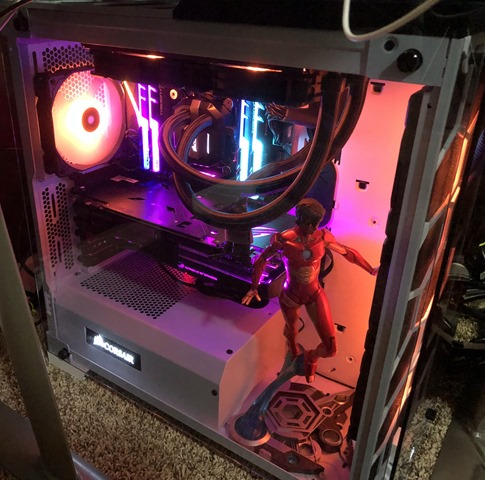
I bought my monitors from Dell directly and the PC parts from NewEgg.com. I named my machine IRONHEART after Marvel's Riri Williams.
- Intel Core i9-7900X 10-Core 3.3 Ghz Desktop Processor - I like this processor for a few reasons. Yes, I'm an Intel fan, but I like that it has 44 PCI Express lanes (that's a lot) which means given I'm not running SLI with my video card, I'll have MORE than enough bandwidth for any peripherals I can throw at this machine. Additionally, it's caching situation is nuts. There's 640k L1, 10 MEGS L2, and 13.8 MEGS L3. 640 ought to be enough for anyone, right? ;) It's also got 20 logical processes plus Intel Turbo Boos Max that will move specific cores to 4.5GHz as needed, up from the base 3.3Ghz freq. It can also support up to 128 GB of RAM, although I'll start with 32gigs it's nice to have the room to grow.
- 288-pin DDR4 3200Mhz (PC4 25600) Memory 4 x 8G - These also have a fun lighting effect, and since my case is clear why not bling it out a little?
- Corsair Hydro Series H100i V2 Extreme Performance Water/Liquid CPU Cooler - My last PC had a heat sink you could see from space. It was massive and unruly. This Cooler/Fan combo mounts cleanly and then sits at the top of the case. It opens up a TON of room and looks fantastic. I really like everything Corsair does.
- WD Black 512GB Performance SSD - M.2 2280 PCIe NVMe Solid State Drive - It's amazing how cheap great SSDs are and I felt it was time to take it to the next level and try M.2 drives. M.2 is the "next generation form factor" for drives and replaces mSATA. M.2 SSDs are tiny and fast. This drive can do as much as 2gigs a second as much as 3x the speed of a SATA SSD. And it's cheap.
- CORSAIR Crystal 570X RGB Tempered Glass, Premium ATX Mid Tower Case, White - I flipping love this case. It's white and clear, but mostly clear. The side is just a piece of tempered glass. There's three RGB LED fans in the front (along with the two I added on the top from the cooler, and one more in the back) and they all are software controllable. The case also has USB ports on top which is great since it's sitting under my clear glass desk. It is very well thought out and includes many cable routing channels so your cables can be effectively invisible. Highly recommended.


- Corsair 120mm RGB LED Fans - Speaking of fans, I got this three pack bringing the total 120mm fan count to 6 (7 if you count the GPU fan that's usually off)
- TWO Anker 10 Port 60W USB hubs. I have a Logitech Brio 4k camera, a Peavey PV6 USB Mixer, and a bunch of other USB3 devices like external hard drives, Xbox Wireless Adapter and the like so I got two of these fantastic Hubs and double-taped them to the desk above the case.
- ASUS ROG GeForce GTX 1080 Ti 11 gig Video Card - This was arguably over the top but in this case I treated myself. First, I didn't want to ever (remember my 5 year goal) sweat video perf. I am/was very happy with my 1070 which is less than half the price, but as I've been getting more into VR, the NVidia 1070 can struggle a little. Additionally, I set the goal to drive 3 4k monitors at 60hz with zero issues, and I felt that the 1080 was the a solid choice.
- THREE Dell Ultra HD 4k Monitors P2715Q 27" - My colleague Damian LOVES these monitors. They are an excellent balance in size and cost and are well-calibrated from the factory. They are a full 4k and support DisplayPort and HDMI 2.0.
-
- Remember that my NVidia card has 2 DisplayPorts and 2 HDMI ports but I want to drive 3 monitors and 1 Vive Pro? I run the center Monitor off DisplayPort and the left and right off HDMI 2.0.
-
NOTE: The P2415Q and P2715Q both support HDMI 2.0 but it's not enabled from the factory. You'll need to enable HDMI 2.0 in the menus (read the support docs) and use a high-speed HDMI cable. Otherwise you'll get 4k at 30hz and that's really a horrible experience. You want 60hz for work at least.
-
NOTE: When running the P2715Q off DisplayPort from an NVidia card you might initially get an output color format of YCbCr 4:2:2 which will make the anti-aliased text have a colored haze while the HDMI 2.0 displays look great with RGB color output. You'll need to go into the menus of the display itself and set the Input Color Format to RGB *and* also into the NVidia display settings after turning the monitor and and off to get it to stick. Otherwise you'll find the NVidia Control Panel will reset to the less desirable YCbCr422 format causing one of your monitors to look different than the others.
-
Last note, sometimes Windows will say that a DisplayPort monitor is running at 59Hz. That's almost assuredly a lie. Believe your video card.
_619e195c-ef65-4d50-907c-8db472f4ecb2.png)
What about perf?
Developers develop, right? A nice .NET benchmark is to compile Orchard Core both "cold" and "warm." I use .NET Core 2.1 downloaded from http://www.dot.net.
Orchard is a fully-featured CMS with 143 projects loaded into Visual Studio. MSBUILD and .NET Core in 2.1 support both parallel and incremental builds.
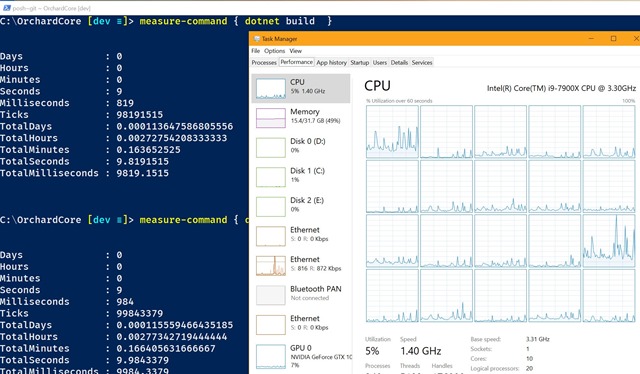
- A warm build of Orchard Core on IRONHEART takes just under 10 seconds.
-
- My Surface Pro 3 builds it warm in 62 seconds.
- A totally cold build (after a dotnet clean) on IRONHEART takes 33.3 seconds.
-
- My Surface Pro 3 builds it cold in 2.4 minutes.
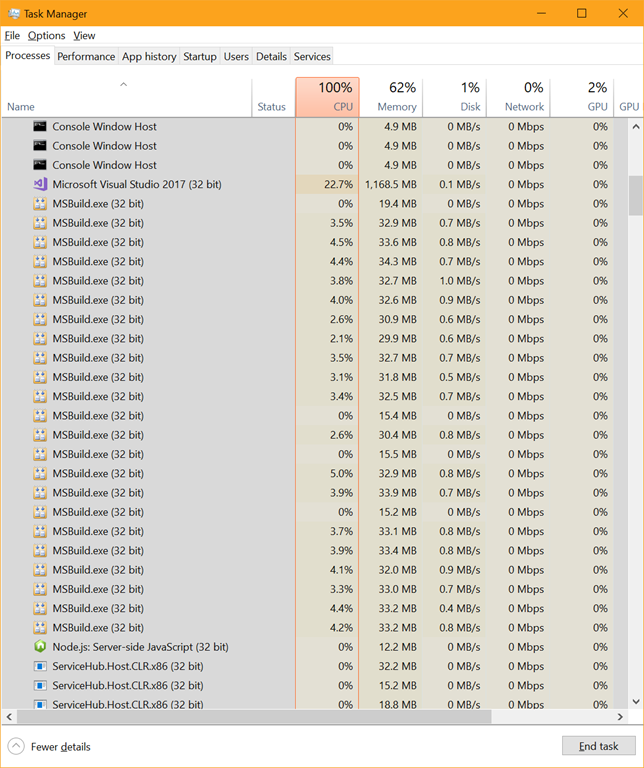
Additionally, the CPUs in this case weren't working at full speed very long. This may be as fast as these 143 projects can be built. Note also that Visual Studio/MSBuild will use as many processors as it your system can handle. In this case it's using 20 procs.

I can choose to constrain things if I think the parallelism is working against me, for example here I can try just with 4 processors. In my testing it doesn't appear that spreading the build across 20 processors is a problem. I tried just 10 (physical processors) and it builds in 12 seconds. With 20 processors (10 with hyperthreading, so 20 logical) it builds in 9.6 seconds so there's clearly a law of diminishing returns here.
dotnet build /maxcpucount:4

Regardless, My podcast site builds in less than 2 seconds on my new machine which makes me happy. I'm thrilled with this new machine and I hope it lasts me for many years.
Why don't you go get .NET Core 2.1 and clone Orchard Core from https://github.com/OrchardCMS/OrchardCore and run this in PowerShell
measure-command { dotnet build }
and let me know in the comments how fast your PC is with both cold and warm builds!
NOTE: I have an affiliate relationship with NewEgg and Amazon so if you use my links to buy something I'll make a small percentage and you're supporting this blog! Thanks!
Sponsor: Preview the latest JetBrains Rider with its built-in spell checking, initial Blazor support, partial C# 7.3 support, enhanced debugger, C# Interactive, and a redesigned Solution Explorer.
© 2018 Scott Hanselman. All rights reserved.
from Scott Hanselman's Blog http://feeds.hanselman.com/~/563695862/0/scotthanselman~Building-the-Ultimate-Developer-PC-The-Parts-List-for-my-new-computer-IronHeart.aspx
Comments
Post a Comment