
Working with Apps in Django

In this tutorial, we’ll learn about:

  1. What is app in django project and why to use it?
  2. How to create app in django project?

So let’s start with very first question.

What is app in django project and why to use it?

We’ve seen that how to create a project in django. Actually each django project consist of some applications where each application have its task to perform. The main advantage to use apps in django is code reusability. If you have designed an app in a project and you need the same functionality to another project that our app is performing. Then you can simply copy and paste our app into another project. Let’s say you have designed a contact form in one website and you want to use the same contact form in another website then you can do it very easily in django.

How to create an app in django project?

In order to create an application in django project, first open command prompt or terminal and navigate to the project folder and type the command given below.

python  manage.py startapp myapp

or if you’re linux or mac user and working with python 3 then type:

python3 manage.py startapp myapp

After entering this command, a folder will be created in your project folder having some files.

Files will be:

  1. py: This file is just to make sure that this file should be treated as package.
  2. admin.py: This file will help us to make the application modifiable while working with the admin interface.
  3. models.py: The models of the application will be stored there. Model means the structure of your app and how it is going to interact with the databases. We’ll discuss more about models in upcoming articles.
  4. tests.py: Unit tests of the app will be stored here.
  5. views.py: views of our application will be stored here.
  6. apps.py: It will contain the name of app to be included to settings.py file and many other things. We’ll see it while making any simple app (for example – blog app).

After creating app we’ve to tell our django project that we’ve made and added an application in our project.

Open your settings.py file and add a path of our newly created app. And edit as:

Working with Apps in Django

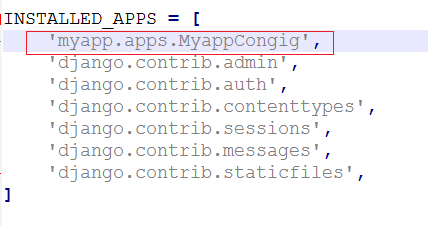
If you’re thinking that where that MyappConfig came from? It’s a reference to myapps’s configuration class. You can see it in apps.py file in our myapp folder.

That’s all we have to do to add an app in our django project. But still there is no use of app without its model. So we’ll learn about models in upcoming articles.

If you’ve any problem related to this article please let us know in comment box.

The post Working with Apps in Django appeared first on The Crazy Programmer.


from The Crazy Programmer https://www.thecrazyprogrammer.com/2018/12/working-with-apps-in-django.html

Comments

Popular posts from this blog

Rail Fence Cipher Program in C and C++[Encryption & Decryption]

Here you will get rail fence cipher program in C and C++ for encryption and decryption. It is a kind of transposition cipher which is also known as zigzag cipher. Below is an example. Here Key = 3. For encryption we write the message diagonally in zigzag form in a matrix having total rows = key and total columns = message length. Then read the matrix row wise horizontally to get encrypted message. Rail Fence Cipher Program in C #include<stdio.h> #include<string.h> void encryptMsg(char msg[], int key){ int msgLen = strlen(msg), i, j, k = -1, row = 0, col = 0; char railMatrix[key][msgLen]; for(i = 0; i < key; ++i) for(j = 0; j < msgLen; ++j) railMatrix[i][j] = '\n'; for(i = 0; i < msgLen; ++i){ railMatrix[row][col++] = msg[i]; if(row == 0 || row == key-1) k= k * (-1); row = row + k; } printf("\nEncrypted Message: "); for(i = 0; i < key; ++i) f...

Data Encryption Standard (DES) Algorithm

Data Encryption Standard is a symmetric-key algorithm for the encrypting the data. It comes under block cipher algorithm which follows Feistel structure. Here is the block diagram of Data Encryption Standard. Fig1: DES Algorithm Block Diagram [Image Source: Cryptography and Network Security Principles and Practices 4 th Ed by William Stallings] Explanation for above diagram: Each character of plain text converted into binary format. Every time we take 64 bits from that and give as input to DES algorithm, then it processed through 16 rounds and then converted to cipher text. Initial Permutation: 64 bit plain text goes under initial permutation and then given to round 1. Since initial permutation step receiving 64 bits, it contains an 1×64 matrix which contains numbers from 1 to 64 but in shuffled order. After that, we arrange our original 64 bit text in the order mentioned in that matrix. [You can see the matrix in below code] After initial permutation, 64 bit text passed throug...

Experimental: Reducing the size of .NET Core applications with Mono's Linker

The .NET team has built a linker to reduce the size of .NET Core applications. It is built on top of the excellent and battle-tested mono linker . The Xamarin tools also use this linker so it makes sense to try it out and perhaps use it everywhere! "In trivial cases, the linker can reduce the size of applications by 50%. The size wins may be more favorable or more moderate for larger applications. The linker removes code in your application and dependent libraries that are not reached by any code paths. It is effectively an application-specific dead code analysis ." - Using the .NET IL Linker I recently updated a 15 year old .NET 1.1 application to cross-platform .NET Core 2.0 so I thought I'd try this experimental linker on it and see the results. The linker is a tool one can use to only ship the minimal possible IL code and metadata that a set of programs might require to run as opposed to the full libraries. It is used by the various Xamarin products to extract...