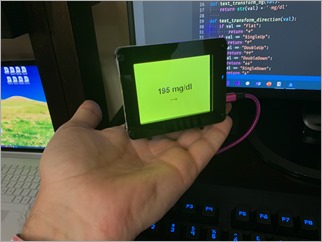
 AdaFruit makes an adorable tiny little Circuit Python IoT device called the PyPortal that's just about perfect for the kids - and me. It a little dakBoard, if you will - a tiny totally programmable display with Wi-Fi and lots of possibilities and sensors. Even better, you can just plug it in over USB and edit the code.py file directly on the drive that will appear. When you save code.py the device soft reboots and runs your code.
I've been using Visual Studio Code to program Circuit Python and it's become my most favorite IoT experience so far because it's just so easy. The "Developer's Inner Loop" of code, deploy, debug is so fast.
As you may know, I use a Dexcom CGM (Continuous Glucose Meter) to manage my Type 1 Diabetes. I feed the data every 5 minutes into an instance of the Nightscout Open Source software hosted in Azure. That gives me a REST API to my own body.
I use that REST API to make "glanceable displays" where I - or my family - can see my blood sugar quickly and easily.
I put my blood sugar in places like:
And today, on a tiny PyPortal device. The code is simple, noting that I don't speak Python, so Pull Requests are always appreciated.
import time

import board

from adafruit_pyportal import PyPortal


# Set up where we'll be fetching data from

DATA_SOURCE = "https://NIGHTSCOUTWEBSITE/api/v1/entries.json?count=1"

BG_VALUE = [0, 'sgv']

BG_DIRECTION = [0, 'direction']


RED = 0xFF0000;

ORANGE = 0xFFA500;

YELLOW = 0xFFFF00;

GREEN = 0x00FF00;


def get_bg_color(val):

    if val > 200:

        return RED

    elif val > 150:

        return YELLOW

    elif val < 60:

        return RED

    elif val < 80:

        return ORANGE

    return GREEN


def text_transform_bg(val):

    return str(val) + ' mg/dl'


def text_transform_direction(val):

    if val == "Flat":

        return "→"

    if val == "SingleUp":

        return "↑"

    if val == "DoubleUp":

        return "↑↑"

    if val == "DoubleDown":

        return "↓↓"

    if val == "SingleDown":

        return "↓"

    if val == "FortyFiveDown":

        return "→↓"

    if val == "FortyFiveUp":

        return "→↑"

    return val


# the current working directory (where this file is)

cwd = ("/"+__file__).rsplit('/', 1)[0]

pyportal = PyPortal(url=DATA_SOURCE,

                    json_path=(BG_VALUE, BG_DIRECTION),

                    status_neopixel=board.NEOPIXEL,

                    default_bg=0xFFFFFF,

                    text_font=cwd+"/fonts/Arial-Bold-24-Complete.bdf",

                    text_position=((90, 120),  # VALUE location

                                   (140, 160)), # DIRECTION location

                    text_color=(0x000000,  # sugar text color

                                0x000000), # direction text color

                    text_wrap=(35, # characters to wrap for sugar

                               0), # no wrap for direction

                    text_maxlen=(180, 30), # max text size for sugar & direction

                    text_transform=(text_transform_bg,text_transform_direction),

                   )


# speed up projects with lots of text by preloading the font!

pyportal.preload_font(b'mg/dl012345789');

pyportal.preload_font((0x2191, 0x2192, 0x2193))

#pyportal.preload_font()


while True:

    try:

        value = pyportal.fetch()

        pyportal.set_background(get_bg_color(value[0]))

        print("Response is", value)

    except RuntimeError as e:

        print("Some error occured, retrying! -", e)

    time.sleep(180)
I've put the code up at https://github.com/shanselman/NightscoutPyPortal. I want to get (make a custom?) a larger BDF (Bitmap Font) that is about twice the size AND includes 45 degree arrows ↗ and ↘ as the font I have is just 24 point and only includes arrows at 90 degrees. Still, great fun and took just an hour!
NOTE: I used the Chortkeh BDF Font viewer to look at the Bitmap Fonts on Windows. I still need to find a larger 48+ PT Arial.
What information would YOU display on a PyPortal?
Sponsor: Manage GitHub Pull Requests right from the IDE with the latest JetBrains Rider. An integrated performance profiler on Windows comes to the rescue as well.
© 2018 Scott Hanselman. All rights reserved.
from Scott Hanselman's Blog http://feeds.hanselman.com/~/600168208/0/scotthanselman~Displaying-your-realtime-Blood-Glucose-from-NightScout-on-an-AdaFruit-PyPortal.aspx
Comments
Post a Comment